
Headless & Wordpress
Understand our infrastructure
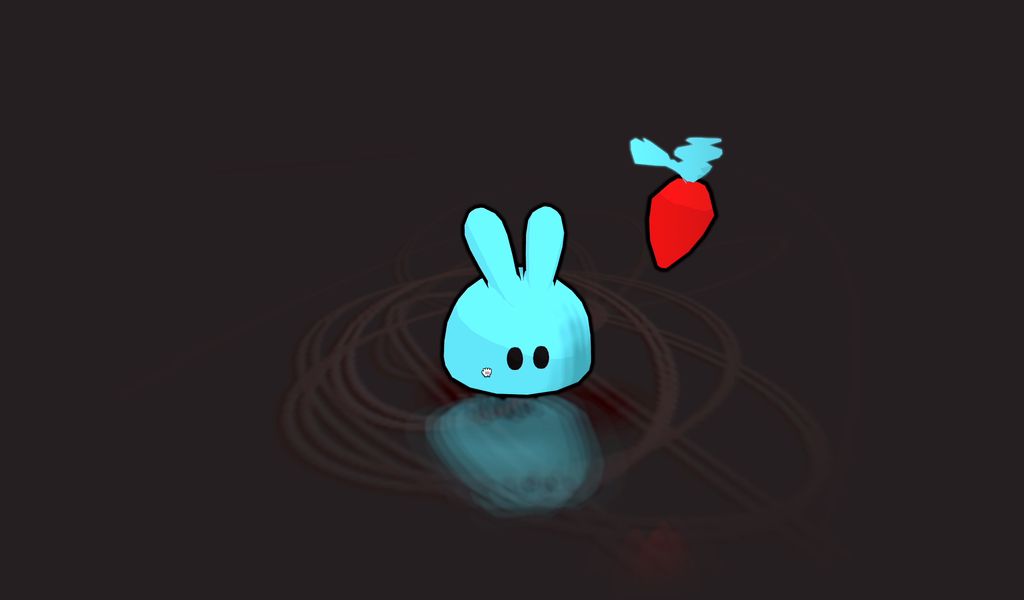
Earlier this year, we released Captain Goosebump. A short and sweet, very casual interactive game experiment where the player collects magical orbs to give the world back its colors.
Give it a play here : https://goosebumps.epic.net/
We had a lot of fun building it and are really proud of how it turned out. There are some pretty neat technical tricks that went into its conception that we think are worth sharing.
So in this post, we’ll talk about procedural generation, game juice, shaders… Sounds interesting? Let’s dive right in!
We’re using three.js for the rendering, matter.js to handle the physics.
Fun fact: due to the complexity (or lack thereof) of the UI, we’ve decided to not use any UI framework here. Just a plain good ol’ html file, with plain good ol’ CSS and plain good ol’ getElementById (with a few GSAP animations sprinkled on top of that). It gets the job done and gets it done quickly!
Because of the desired “infinite” nature of the terrain, we quickly decided that we were going to use procedural generation.
Procedural generation is fascinating. There are infinite ways of using it to build terrain. Here’s our recipe that is tailored for these gameplay requirements.
Terrain is built chunk by chunk, chunks are stitched one after the other.
We initially create N chunks, enough so that their total length is greater than the viewport width and add an extra chunk for good measure.
Chunks are destroyed once they leave the left side of the viewport behind the player.
When a chunk is destroyed, a new one is created and placed and the end where it not yet visible.
See the Pen
Captain Goosebumps – Infinite procedural terrain generation V2 by Théo Gil (@theo-gil)
on CodePen.
Now, here’s how we build a single chunk:
We settled on this particular method because using angles and distances felt more natural to us to describe the slopes of a terrain than, for example, tweaking the amplitude and frequency of perlin noise.
See the Pen
Captain Goosebumps – Procedural terrain chunk by Théo Gil (@theo-gil)
on CodePen.
Since we’ve already computed the CatmullRomCurve3 for each terrain chunk, we can leverage the Curve.getPointAt method to sample points along the curve.
Every time a chunk is created, we compute a number of potential obstacles to add to it and sample as many points along the curve. Then we go through those points and run each of them through a series of checks to either validate or disregard them.
Rule n°1: Every obstacle must be at least MIN_DISTANCE away from every other obstacle
Rule n°2 : The steepness of the curve at the obstacle position must not be greater than STEEPNESS_THRESHOLD.
The first rule prevents obstacles clusters. Those are not aesthetically pleasing and by ensuring that there is a safe distance between every obstacle, we make sure that it is not possible to have a configuration where the player physically cannot jump over obstacles
The second rule prevents the spawning of obstacles in curve sections that are too steep. We found that this helped anchoring the game in a somewhat physically correct reality 😄
Steepness is computed by comparing the tangent at OBSTACLE_POSITION and the tangent at OBSTACLE_POSITION + VERY_SMALL_LOOKAHEAD_OFFSET
Side note: player will crash when colliding with obstacles from the sides, but will bounce back when colliding from the top. This makes the player feels in control while also granting the player more expressivity in movement.
See the Pen
Captain Goosebumps – Procedural obstacle placement by Théo Gil (@theo-gil)
on CodePen.
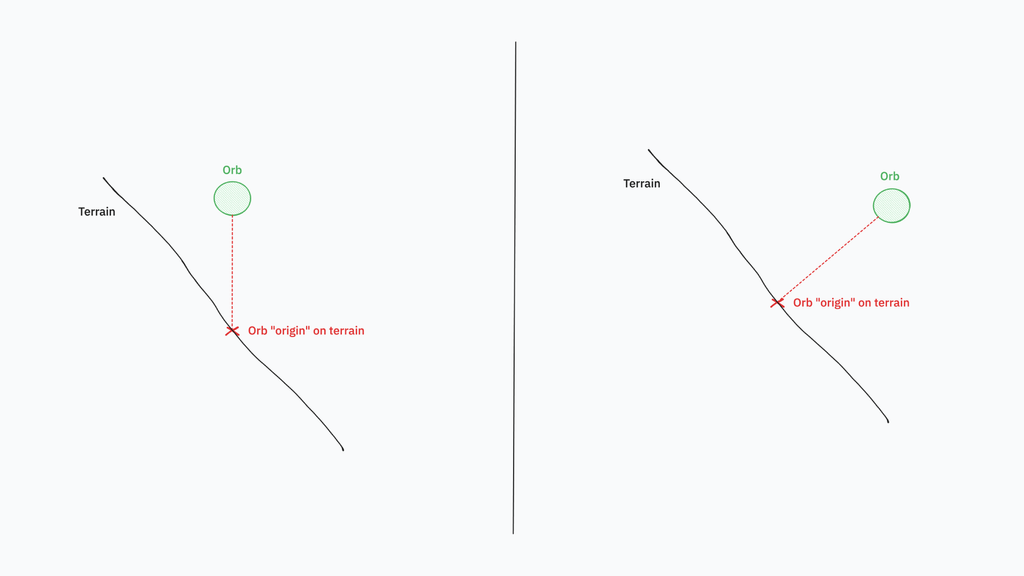
The spawning of magical orb is easy. We pick the first terrain chunk that is not yet visible in the viewport. And, again, make use of the getPointAt method to sample a point at random position along the chunk’s curve.
Now we want the orb to “float above” the ground. We could do so by applying an offset to the Y component but we had better results by projecting it alongside the normal of the curve.
If the player misses the orb and it leaves the screen, we go through the same process again, repositioning if further in the terrain.
If the user does catch the orb, we flag the orb as collected, move to the next one and place it by using the same process.
Now that we have an infinitely procedurally generated terrain, let’s add our player to it, shall we?
Our player collider is a simple circle. Each frame, we copy the position and rotation of the physical collider to its visual counterpart. Easy peasy.
An important note is to remember to disabled the physical body’s angular velocity, otherwise, it will start rolling on itself like a snowball!
At each frame, we overwrite the X velocity component of the player’s physical body by a constant X_VELOCITY value.
Having the velocity being handled automatically allows the player to only have to worry about the jumping part.
This is important to us since we knew we wanted a “one button” control system in order to lower the entry barrier as much as possible. No need to figure out controls. As soon as the page loads, you already know how to play the game.
The next three tricks are pretty well known by game designers and can be found in most (in not every) platformer games of the last 20 years. They grant the player leniency and add up to an experience that feels reactive and natural.
Wahoo! This one is easy. The longer you press the jump button, the higher you jump. Giving the player more expression and control over the jump. There are, again, a lot of ways you can implement this. Here’s how we’ve done it here, which is really straight forward.
When the player starts to jump, we start a JUMP_BUTTON_DOWN timer.
During each subsequent frame, and until the player becomes grounded again or the player releases the jump button, we add the delta time (the elapsed time between current and previous frame) to the timer.
While the jump button is pressed and the timer value is lower than JUMP_TIMER_MAX, we apply the desired Y velocity to the player’s physical body.
This one gets its name from a famous cartoon coyote that you can see standing still in the air for a short moment, until the physical reality kicks it and the poor thing falls to its demise.
The idea here is simple : if the player presses the jump button a few frames after leaving the ground, allow it and do jump, even if the player isn’t grounded anymore.
The purpose of the mechanic is to give some leniency to the player regarding the jump timing. The human player does not have instant reflexes and having our jump disregarded by a heart hearted computer program is a super frustrating experience, I know you know the feeling, we don’t want that.
This mechanic is even more crucial that the physical bodies used for computing the grounded properties, while close, are not exact matches of the rendered visual entities.
We can implement this easily by starting a COYOTE_TIMER timer as soon as the player is not grounded anymore then adding the delta to the timer each frame. When pressing the jump button, we check whether the player is grounded OR the COYOTE_TIMER value is below COYOTE_TIMER_MAX.
The tolerance threshold value is going to be different in each game depending on how lenient you want to be to the player. I recommend keeping it as low as possible, just enough so that it is there but not too noticeable by the player. If the value is too high, the effect becomes obvious and could be perceived as broken.
Jump buffering is almost the same idea as the coyote jump (give the player leniency) but the other way around. This time, if the player hits the jump button a few frames early before landing on the ground we’ll save it and make the player jump as soon as it actually lands.
It also works the same way. When pressing the jump button, if we do not meet the “can jump” conditions, we start a JUMP_BUFFERING_TIMER. Each frame we add the delta value to the timer. When the player state goes from “not grounded” to “grounded”, if the timer value is below JUMP_TIMER_MAX, we automatically trigger a jump.
Again, subtlety is key here. Just a tiny bit of tolerance will increase the game feel a long way but we do not want to go overboard.
There already are extensive, high quality resources online on those matters. I strongly recommend playing with these interactive demo and see how the different parameters affects gameplay: https://gmtk.itch.io/platformer-toolkit
The obvious solution is to apply the XY position of the player to the camera. However, it did not work well with our gameplay mechanics.
When the player jumps really high, the camera follows it and the ground ends up outside of the camera view. This is bad because we have to see the ground and where we want to land in order to control the jump.
What we’ve done instead is firing a ray downward from the player position and use the intersection position of the ray and the ground as the camera target, ensuring that ground below the player is always visible.
That’s smart but now we have the opposite issue. When the player jumps too high, the player leaves the camera view. That’s not good either.
We solved this by computing the camera frustum dimensions at the depth of the player (which never changes, it is always 0) and modulating the Z position of the camera accordingly so that both the raycast intersection and the player are contained within the frustum. If they are not, we adjust the Z position of the camera accordingly so that everything is visible on screen + a little bit of padding because it is more pretty and less messy.
Finally, we apply a small XY translation to the camera in order to offset the target slightly to the left. We do this because our gameplay requires the player to look in front of it rather than behind it.
Everything must support gameplay.
By combining those three points, we
This effects relies on a particular UV mapping technique (brilliantly described by Vicente Moscardo Ribes in this blog post).
Here’s how the UVs are laid out in our case:
Funky? Maybe. Efficient? Definitely!
Now we would like for the game to start without any colors and progressively introduce new colors as the player collects orbs.
An easy solution for this is to use 6 new texture masks, each one being linked to one orb and masking specific parts of the images. Those 6 textures are then packed into the red, green and blue channels of two files.
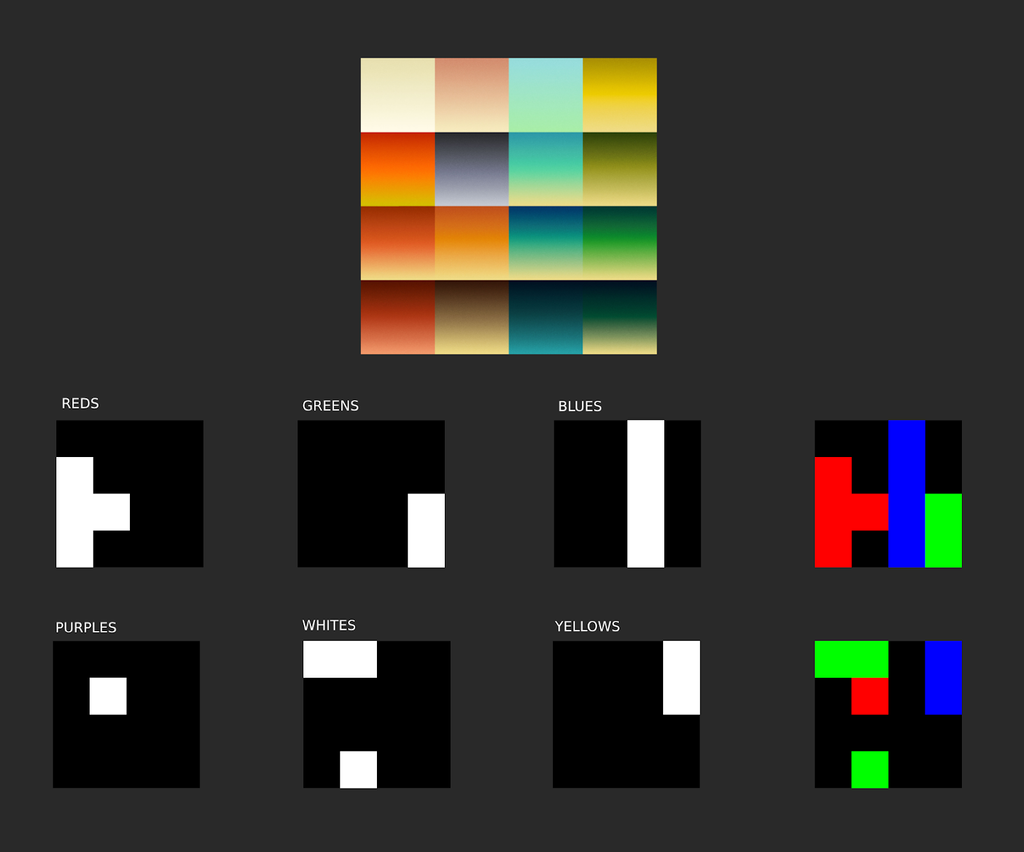
With a little shader trickery, it becomes easy to disable specific colors altogether by combining the different mask values together and using the result to display the actual color or the black and white version.
varying vec2 vUv;

uniform sampler2D uMap;
uniform sampler2D uColorMaskRGB;
uniform sampler2D uColorMaskPWY;
// They all are initialized at 0.0 and are animated to 1.0 when the player collects the corresponding orb
// Tip: If you are an optimisation freak, you can pack those 6 float uniforms into only two vec3 uniforms
uniform float uRedsAmount;
uniform float uGreensAmount;
uniform float uBluesAmount;
uniform float uPurplesAmount;
uniform float uWhitesAmount;
uniform float uYellowsAmount;

void main() {
  // Sample base color, this is what the color of the pixel would be without any processing
  vec4 baseColor = texture2D(uMap, vUv);

  // Compute the grayscale value of the pixel by averaging its red, green and blue components
  float grayscale = (baseColor.r + baseColor.g + baseColor.b) / 3.0;
  vec4 grayscaleColor = vec4(
    grayscale,
    grayscale,
    grayscale,
    baseColor.a
  );

  vec4 colorMaskRGB = texture2D(uColorMaskRGB, vUv);
  vec4 colorMaskPWY = texture2D(uColorMaskPWY, vUv);

  // Compute the mask value
  float mask = 0.;
  mask += colorMaskRGB.r * uRedsAmount; // Red orb mask is stored in the red channel
  mask += colorMaskRGB.g * uGreensAmount; // Green orb mask is stored in the green channel
  mask += colorMaskRGB.b * uBluesAmount; // Blue orb mask is stored in the red blue
  mask += colorMaskPWY.r * uPurplesAmount; // Purple orb mask is stored in the red channel
  mask += colorMaskPWY.g * uWhitesAmount; // White orb mask is stored in the green channel
  mask += colorMaskPWY.b * uYellowsAmount; // Yellow orb mask is stored in the blue channel
  mask = clamp(mask, 0.0, 1.0); // Clamp between 0 and 1 for good measure

  // Mix both baseColor and grayscaleColor depending on the mask value.
  // If mask is 1.0, then we'll use baseColor, if it is 0.0, we'll use grayscaleColor
  vec4 finalColor = mix(grayscaleColor, baseColor, mask);
}
For the trail, we repurposed the trail rendering technique that Karim already built and described in this post (see “Talking about drawing circles” section).
The black and white trail texture is then sent to our custom shader and it is used as a mask to blend a night blue overlay.
See the Pen
Reveal mask by Karim Maaloul (@Yakudoo)
on CodePen.
That’s all for now! I hope you found those insights valuable and that this blog post illustrates how combining multiple simple systems can result in a rich and intricate experience.
There a few points that have been left out of this article (audio, particle systems, object pooling, animations…), hopefully we’ll get a chance to dive into those in a future one!
Thank you for reading!